
N0RQ’s notes on the GE MVS radios
There is a nice handful of fellow hams who use the GE MVS radios for amateur use, both voice and data. Three or four of them have been particularly helpful to me in understanding how they work, and without mentioning names/callsigns, a big thank you to each of them.
(Programming instructions are found halfway down this page…)
In an effort to assist others who might be interested in doing the same, this web page has been put together. First, some links (from guys that know more about these than I do):
VE3FYN notes (very helpful)
KD4BBM notes (includes several alternative ways of modifying these radios)
K3JLS technical info on the MVS
W4XE’s notes on the MVS
eham.net reviews of the GE MVS
The MVS units are particularly suited to data/packet use, mainly APRS, but also Winlink and traditional packet. Some guys even use them as simplex IRLP nodes.
Programming the MVS requires two things:
software (details halfway down the page)
an interface (details halfway down the page)
By popular demand, scroll halfway down this page for instructions on programming (using the software). It is old DOS-based, but not overly hard — it just takes a bit of getting used to.
Since it is not easily programmable, the MVS is not nearly as frequency-agile as a typical 2m ham radio, thus using it for voice is OK, as long as you don’t need to change to a freq that isn’t programmed into the unit. But this is where this model shines for data — it can be programmed for all the normal data/packet freqs, still have some channels left over, and you shouldn’t ever have to worry about having to reprogram it.
Picture of a pair I have in the shack for area repeaters (UHF & VHF):
Most of the MVS models have 16 channels. Some have only 2, and a very few have 128. With the 2-channel model, you can program one for 144.390 and the other for the “alternate” APRS freq of 144.340, or whatever else you see fit. I use a 2-channel model in my car as an APRS tracker. Works great, costs a bunch less than any “real” ham radio. My other MVS units are all 16-channel units. By default, I program in 5 packet freqs and 4 APRS freqs, leaving 7 open spots, which can be filled with NOAA WX freqs, repeaters, simplex, etc.
Here are some files that might be of interest:
- MVS model #s & descriptions (.pdf)
- model # chart
- “Maint” manual (.pdf)
- Operators manual (.pdf)
- Installation manual (.pdf)
- Service section manual (.pdf) The error codes E0, E1, E2, and E3 are found here, on page 3 (.pdf page 4) of the manual. See more info about error codes on this page of the Repeater Builder site.
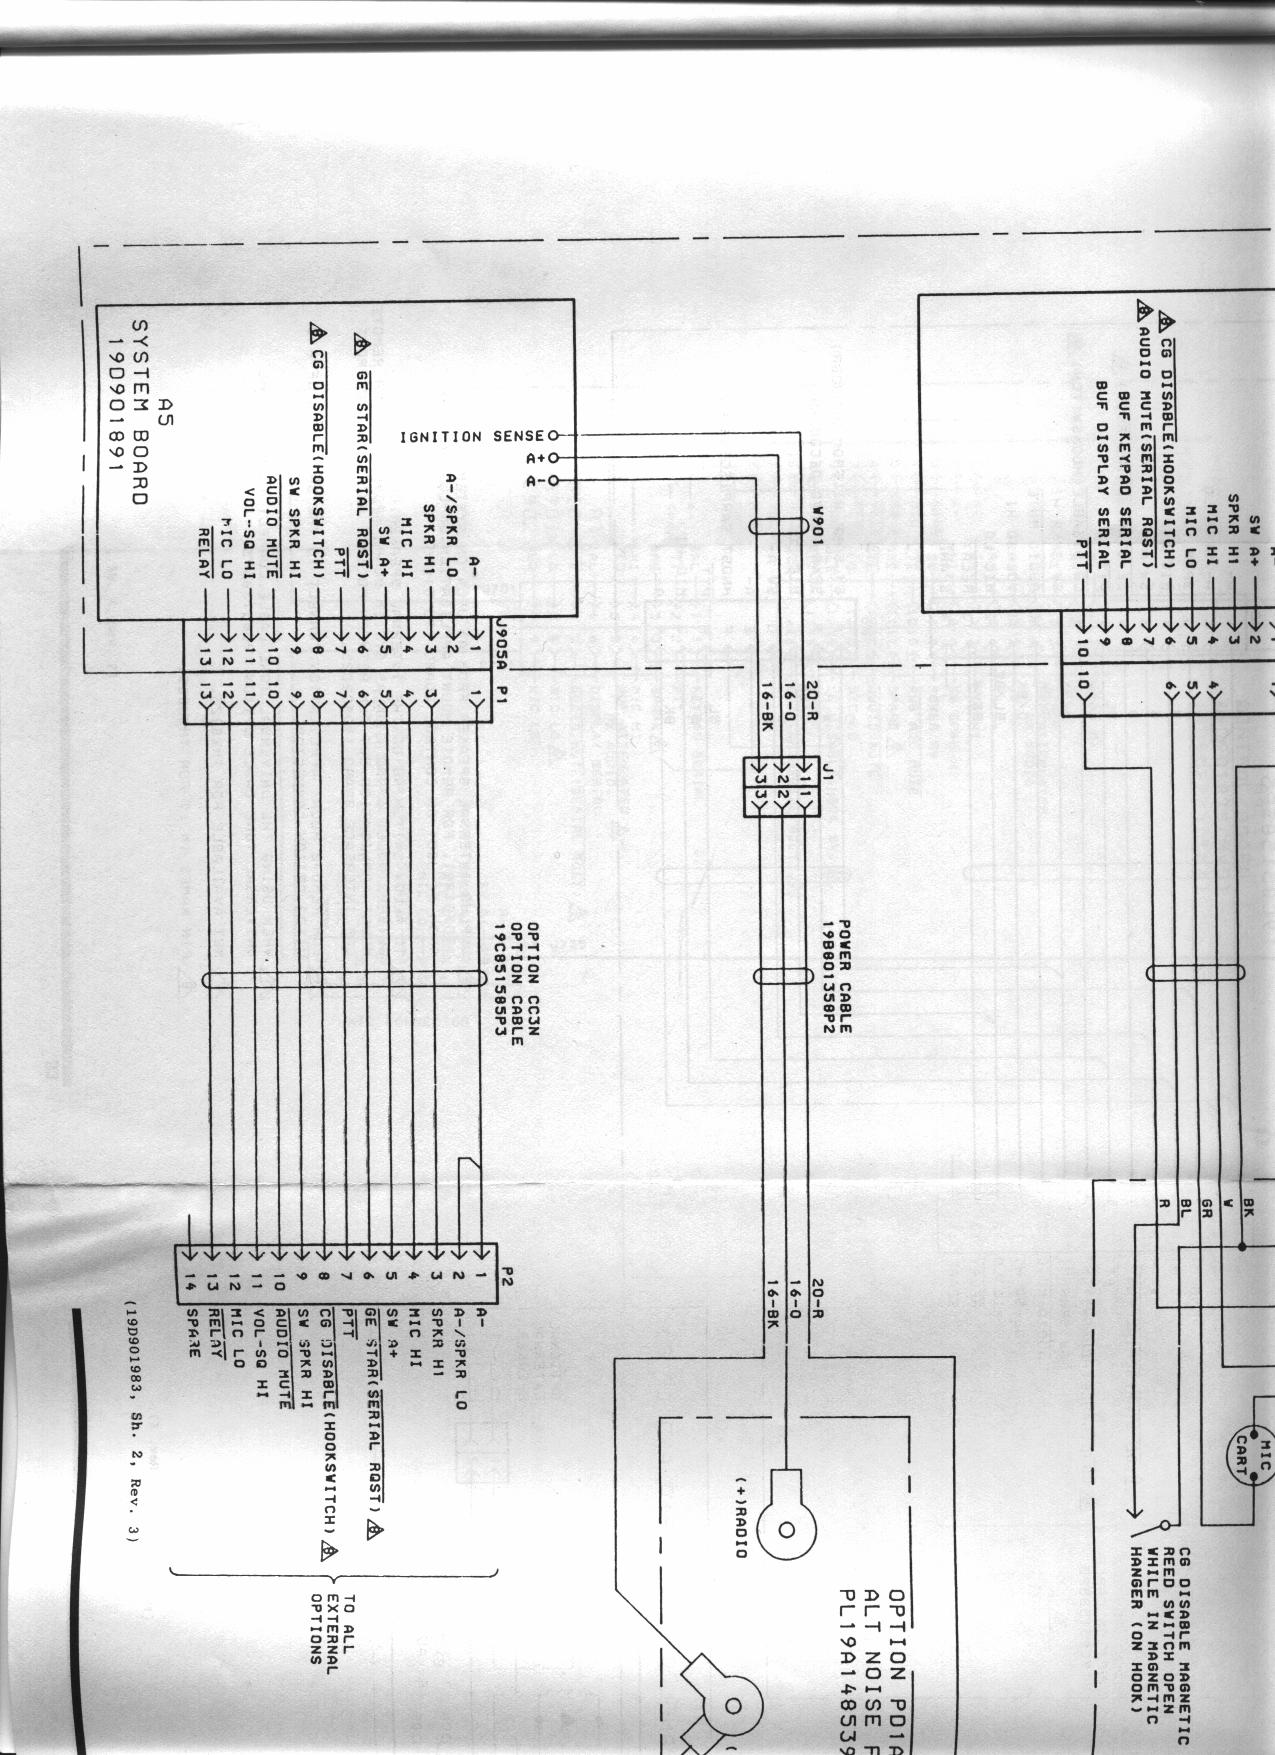
- schematic of the data / accessory cable (.jpg)
More MVS manuals and other GE manuals can be found at Repeater Builder web site, and some here as well.
How I convert these things to amateur/packet use:
-
power up test, see if all buttons work (some buttons tend to get dirty/sticky after many years)
-
check LCD display (sometimes there are dark blotches that make it unreadable)
-
program with my list of default freqs (7 NOAA WX & 9 packet/Winlink/APRS)
-
check power output and frequency accuracy (need decent meter & freq counter)
-
if all those things are OK, then continue with the conversion in the next step…
-
remove from power!, then remove bottom cover, and:
a) plug in orange speaker wires/plug if it was unplugged
b) remove extraneous post-manufacture tone board, if installed, insulating ends of wires
c) cut one orange speaker wire, install external switch, so speaker can be turned off (because the Volume control on these radios will not go down to zero, and no one wants to listen to packet sounds for very long) -
reinstall bottom cover
-
cut off original power connector and data cable plug
-
strip power & data cable wires
-
power cable: orange and red twist together, attach to fuse holder, then attach red/black zip cord to negative lead & fuse holder
-
data cable: attached DB-9M cable wires to MVS data cable wires (standard of 4 are needed, + 1 if providing power from the radio to a TinyTrak or TNC)
-
install TNC-male to UHF-female (SO-239) adapter (I get mine at http://www.baproducts.com/rf-conn.htm, look for RFA-8413)
-
test: 1 minute xmit stress test, watching power & freq stability; also test with TNC or TinyTrak for functionality
-
final cleaning, checking, & get ready to use or sell
 This picture shows an MVS powering a TinyTrak3 via tan DB9M cable (the black cable on other end of the TT3 goes to the GPS unit).
A few items of note:
-
The manual says 15 Amp fuse, but I usually put in a 10 Amp, never had a problem. You’ll only get ~35w (max 40w) out of them anyway.
-
There is an internal fuse, 3 Amp. If you have an MVS that won’t power up, check this fuse. Under the bottom cover, look for a little green thing that resembles a resistor — labeled F901 — bypass it temporarily and see if it powers up, or check it with an Ohmmeter to see if it is bad. VE3FYN has some good notes and a picture.
-
Mouser part for mic plug (Mouser # 538-22-55-2102)
-
Mouser part for pin for mic plug (Mouser # 538-16-02-1116)
Microphones — if you have a mic for one of these radios, great, they work fine for repeater/simplex voice use. There is a trick, though, related to mics and PL/CTCSS tones in receive mode. The GE mics came with a special mic holder that had a magnet on it, and the mics themselves have a reed switch in the back of the mic. When the mic is hanging on the mic hook (“on hook”) the receive PL/CTCSS programming is honored. However, when the mic is “off hook”, any PL/CTCSS requirements for receive are ignored. So if you have a mic plugged in, and you’re hearing stuff (on a repeater freq mainly) that should be ignored because of PL/CTCSS decode, it is because your mic is “off hook”. The special mic hooks are rather hard to find (and $$ if you do find them), so to force the mic to stop the on/off-hook silliness, open up the back of the mic and clip the little (blue?) wire that goes to the little switch area at the back of the mic. It will make the radio think that the mic is always on-hook. End of problem — the radio will now always honor the PL/CTCSS tones on receive. Ain’t that fun? 😉 See pdf page 15 (printed page 13) of the Installation manual for a picture and the original GE explanation.
That’s about all I know. I’m not much of a technician, so I probably won’t be able to address any in-depth technical questions, but if you’d like to send me a note, send it to mycallsign at att.net .
2012: I currently have these MVS units in service:
-
2 as APRS digipeaters
-
2 as APRS I-gates
-
2 as mobile APRS trackers
-
1 “go-kit” ready for ARES use
-
2 in the shack for voice/repeater use (1 VHF, 1 UHF)
-
(and several spares waiting for me to prepare for ham use)
N0RQ’s notes on PROGRAMMING the GE MVS radios
OK, so you’ve obtained an old GE (or Ericsson) MVS radio. Good for you!
But HOW do you program the thing???
To begin with, you need two things:
-
software (old DOS software available on the internet in a Yahoo Group called “GE”, files section, folder called Programming software, look for the file called MVS v 3.zip) — it will run under WinXP and Win7 just fine — and to make it easier, I’ve included a copy of that file right here (and you’ll need a computer with a serial port, of course — must be COM1 or COM2). Suggestion: install it into a folder such as C:\GE , not in some multi-level folder with long names, otherwise you may get “invalid characters in file name” errors when you try to save a config (personality) file.
-
an interface – sometimes, those interfaces can be found on eBay for ~$40-$50 (do a search on GE MVS PROGRAM* CABLE). You can probably find a programming service on eBay if you don’t want to buy a cable…
Here are step-by-step instructions. I’m not going to include every key stroke, and I’m not showing every possible screen shot of the software, but it should be enough to get you going. I’m assuming you’ve installed the software (above) already. Note that there is no mouse clicking in this old software — it is all keystrokes.
1) Plug in the programming interface (cable) into computer COM1 or COM2, and plug the other end (carefully) into the MIC connector on the bottom of the MVS radio. (Note that it only goes in one way.)
2) Turn the radio on and start the software. The software executable will be called MVS.EXE in whatever directory you unzipped the files into (C:\GE in the examples below). The screen will look like this (minus all the filenames in green):

In the middle of the screen are any files (called “personalities”) that you’ve saved.
At the bottom are the F (function) key actions.
3) Though you won’t normally have to do this, hit F1 to set the setup screen:

On the left, you can specify if it is 2, 16, or 128 channel model.
Hit F1 (Switch) to flip to the right side of the screen, and you can specify which model radio you have. Most will be the 150-174 models, which are fine for 144-148 MHz. You don’t have to change anything — the software will figure out which radio you have when you READ from it.
4) Hit F10 to go Back to the main screen.
5) Now hit F3 (Utility). The only thing that will change is the F-keys on the bottom:

(It is sort-of like a second menu, if you will.)
6) You won’t have to do this often, either, but now hit F1 (Port), and it will bring up a little box within the main window:

You can either use COM1 or COM2 — type a “1” (the default) or a “2”, and then press F1. Like I mentioned earlier, it MUST be COM1 or COM2 — no, 3 or 4 or 8 will not work, period.
7) Just to get you used to the software, on this “Utility” menu, you can F3 to change the computer file directory location, F5 to delete a file, or F10 to go Back to the main menu. Note that F9 (Help) doesn’t seem to work (at least for me).
8) So hit F10 to go back to the Main menu (instead of the Utility menu).
9) The Main Menu functions are:
F1 – Setup screen (covered above)
F2 – Change screen (used to EDIT one of the files)
F3 – Utility screen (covered above)
F4 – New file creation
F5 – Program — to SEND data to the radio
F6 – Read — to READ data from the radio
F9 – Help (doesn’t work)
F10 – Exit the software
Most of the time, you’ll use F2, F5, and F6.
10) If this is the first time you’re doing this, I’d suggest F6 (READ) — to see what’s programmed in your unit. So hit F6, and you’ll see the READ screen:

Type in a filename (example shows “ORIGINAL”), and hit F1, and if it works, in a few seconds the radio’s “personality” (programming) will be read and stored in a file called ORIGINAL.MVS in the same directory as where you put the software. That’s great — but what was in it?
11) Use the up/down/left/right arrows on the keyboard until your filename is highlighted in the middle of the screen, and then press F2 (CHANGE), and then press F1 (to confirm), and you’ll see the EDIT screen:

This is the bread & butter of what you’re probably looking for. Note the columns:
-
Channel # – this is self-explanatory
-
Frequencies – both transmit & receive — this doesn’t have offsets, such as +-600kHz — you plug the numbers in manually — so type carefully and review them before you actually send data to the radio
-
Next is Channel Guard – this is PL / CTCSS, both transmit and receive. Note there is a trick to making the MVS honor the receive PL tone — see the “microphone” paragraph way up above for details on that.
-
Next is STE – this is Squelch Tail Elimination – to summarize, since the receiving radio won’t be a GE MVS, this GE trickery is useless for ham use — so leave it at N.
-
Next is CCT – this is Carrier Control Timer, GE’s name for the timeout timer. It turns the MVS transmitter off after a certain period, as defined via F7 (OPTION). It is wise to set this as Y. The specific time value will be set in the Radio/Scan options shown below.
OK, so there are the columns. You’re in CHANGE (EDIT) mode. Start typing freqs & PL tones as you desire, hitting Enter after you put the numbers in each field. After you fill up 8 channels, hit PAGE DOWN to scroll to the final 8 channels.
MAJOR TRICK: If yours is a 150-174MHz model, the software won’t like it if you type in 146.520, because it is out of range. No problemo — instead if hitting ENTER to leave the particular field on the screen, hit CTRL+E (hold down Control and hit the letter “E”). This will force the software to allow your out-of-range freq to be put in. How easy was that???
In the example above, you can see a couple of NOAA WX freqs listed in the Receive column. If you program in non-amateur Receive freqs, please leave the TX freq blank (as in the example above), so that you don’t transmit where you shouldn’t.
So, with all the freqs & tones in, and STE set at N and CCT set at Y, lets do the Options.
12) In the CHANGE (EDIT) window, hit F7 (OPTION). You’ll see:

Here you can set CCT time (in minutes) – if yours will be for data, a CCT of .5 or 1.0 (30 or 60 seconds) might be best. If you’re going to plug in a mic and yak on a repeater, a value of 1.5 to 2.0 (minutes) might be better, depending on how full of hot air you are :-).
Next are some scan options — If you’re not going to scan, this stuff isn’t critical:
-
Scan Hang Time – how long to wait after a signal is received before scanning resumes
-
Hang after PTT – yes, wait after you PTT before scan resumes
-
Scan for Channel Guard (PL) – yes
-
Scan Xmit Channel – if, while scanning, you hit PTT, xmit on that same channel
-
Off-hook scan enable — the whole “mic hook” thing is annoying for hams (see above) — set this as yes and leave it
-
P1 channel programming – the MVS has neat scanning priority channels (2 of them, P1 and P2), and you probably want to control that from the FRONT of the radio
-
See pdf page 9 (printed page 16) of the “Maint” manual (see links for manuals above) for detailed description of all that.
Hit ESCape to get out of the mini-window, and you’ll be back on the CHANGE (EDIT) window.
Now hit F4 (TEXT), and you’ll get a little window where you can put in free-form text. This doesn’t do anything, so it is completely optional. You may wish to put in your callsign or something, just for grins. Hit ESCape to exit back to the CHANGE window.
13) SO, now your editing is done!!! Hit F10 to exit, and F1 to confirm and save your changes. In order to not overwrite the file with the original freqs, you’ll probably want to change the FILENAME to something meaningful (8 chars max, of course). If you get an “invalid characters in file name” error, I believe that means the old DOS software doesn’t like the directory structure. Way back up in my item #1 at the top of this page, I suggested installing this software in a folder such as C:\GE — and if you did that, you should be fine. If not, then copy your installation folder to C:\GE (or similar), and try again. 🙂
14) You are now back on the MAIN screen. Make sure your correct file is highlighted in the middle, and hit F5 (PROGRAM). You’ll see the PROGRAM RADIO confirmation window:

Make sure the right filename is shown, and hit F1 to send the data to the radio. If successful, it will beep, and in a few seconds, your radio will be programmed! If you’re not sure, do a F6 (READ) to a new filename, then F2 (CHANGE) that file to see what is in it.
If it worked, you’re done. Go forth and xmit/rcv.
However, if you get an error code (E0 or E3 or similar in the radio’s display window), that means something is wrong…. things to try: make sure programming cable is plugged in the mic jack fully, turn radio off and back on, try again…, make sure you’re not trying to program a UHF model with VHF frequencies, etc —- otherwise, near the top of this page, search for E0, and find the link & notes on the error codes.
Well, that’s all I know. I hope it was helpful. Thanks for the nice comments from some of you that have made good use of it!
73, Dave N0RQ